
FileZilla is a free, open source software available for windows, linux and MAC that will help you transfer your files to the web easily via FTP.
You can download filezilla ftp client here. After downloading is complete, double click on file and follow further instructions to install it.
Prerequisite data:
Before uploading any file to your website, you will need some information with you. Following information is required in order to upload files to filezilla FTP client:
1. Username of your FTP account
2. Password of your FTP account
3. Directory where you want your files to be uploaded – It could be the root directory, public_html folder, any sub-directory or any sub-domain.
Once you have installed the FTP client and have required information, you are ready to upload files to your web server.
Following are the steps to upload files using filezilla:
1. Connect to your FTP account
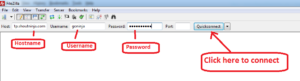
First step in uploading a file to your web server is to connect to your server. Open the filezilla client and you will see following fields on top:
> Host: Enter ‘ftp.yourdomainname’ in host field. e.g. If your domain name is ‘ShoutNinja.com’, you should enter ‘ftp.shoutninja.com’ in host field.
> Username: Enter the username of your FTP account here. e.g. goninja@shoutninja.com (make sure to add @domainname after username).
> Password: Enter the password of your FTP account here.
> Port: Leave this field blank.
connect to filezilla
After you enter the above information, click on ‘Quick connect’ button and filezilla will connect you to your FTP account.
2. Navigate to destination folder
Now you are connected to your FTP account and all your files on server are showing on right panel of FTP. Initially, root directory of your server will be shown. First, you should navigate to the public_html folder. This is the place where you should upload your files to be available online. If you want to upload files in any other folder, sub directory or sub-domain, you should double click on folder to view its content. Locate to the folder where you want to upload the files.
3. Navigate to local files
Next step is to navigate to the local path where files to be uploaded are present. For this, left panel of FTP is used. On upper left, navigate to the folder where files are present and doubleclick on it, you will be able to view all of its content on bottom left panel.
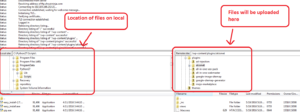
filezilla directory
4. Upload your files
You have located the source and destination of files. Now, you just need to drag the files from local site (left panel) and drop to the server (right panel).
At bottom, you can view the statistics of transfer such as queued files, failed transfers & successful transfers.